Tag: how to

  • 8 Easy Ways to Go Organic & Save Money on Your Skincare Routine

    8 Easy Ways to Go Organic & Save Money on Your Skincare Routine

    Making the switch to all natural skin care products can seem intimidating but it doesn’t need to be.  Don’t waste one more day depriving your skin of all the benefits involved with these nutrient rich alternatives to your everyday routine.  It may take some getting used to (especially the smell of ACV) however, I’ve found these antidotes to be much more effective AND affordable than the mid-range products I’d been buying for years!  The great news is, whether you make your own or find your favorite all-natural line, there are many options out there.  Remember that you have spent your entire life shaping the condition of your skin so results don’t happen overnight but with consistency and the right remedies, you will begin to see an incredible difference in your overall appearance…I know I have.  And as with anything involving your personal health, always be sure to fully research something before you try it.

    ~~~

    1.  Switch out your moisturizer for Jojoba Oil.  Jojoba is the most similar to our skin’s natural sebum and doesn’t leave behind any greasy feeling residue.  I could bathe in this stuff.

    2.  Apple cider vinegar (commonly referred to as ACV) works wonders as a skin brightening toner, balancing your pH levels and getting rid of red, splotchy skin.  It’s nutrient rich properties are full of enzymes, pectin, B vitamins, folic acid and potassium that promote overall health.  Try replacing your old toner with your very own concoction of equal parts ACV and water (for more sensitive skin) and gradually work your way up to a more potent remedy.  It’s important to note that you only really get the benefits of ACV with the raw, unfiltered and unpasteurized version containing “the mother“.  It sounds foreign and, quite possibly, extraterrestrial but this is really one product that can be utilized for a number of things…but we’ll discuss that another time.  If you’re really looking to enhance the appearance of your skin, try apple cider vinegar as a toner and a daily supplement by mixing 1-2 tablespoons in water (or apple juice-yum!) to mask the flavor, up to three times a day.

    3.  Use coconut oil instead of lotion.  Simply put, I can’t believe I ever used drug store lotions.  The chemicals used in some can actually has reverse effects by stripping your skin of its natural oils.  Have you ever tried reading the ingredients on the back of your typical drug store brand?  It might have well been written in Chinese…that’s assuming you definitely don’t speak Chinese.  You can pick up a large container of organic coconut oil at Costco, in fact, I believe it comes in a two-pack.  (Oh, I love you Costco).  Keep one in the kitchen for cooking and stick the other one in your bathroom for slathering yourself up after the shower.  Your skin will thank you!    **Use your fingers to massage a dab of coconut oil under your eyes before bed to wake up looking refreshed.

    4.  Make your own body wash.  Your skin is the biggest organ on your body and comes into contact with many toxins and chemicals throughout the day, some coming from household products within your very own home.  Pollution and other particles are absorbed by your skin each day leaving it dry and susceptible.  Making your own wash smells delicious, costs less than buying other brands with similar quality ingredients and is completely customizable!  This is the recipe I’ve been using lately and I love it!

    5.  Vitamin E oil has so many benefits.  It’s frequently used for acne scars, eczema, psoriasis, brittle cuticles, sunburns, split ends and more.  Use vitamin E oil as an overnight lip repair or in place of chapstick.  As with coconut oil, you can also use a dab or two under each eye before bed as a under eye night serum.

    6.  Tea tree oil is an incredible product.  You can pick up a bottle for a couple bucks at Trader Joe’s or any grocery/beauty supply store that carries natural products.  Use it to spot treat pimples by lightly swabbing over it with a Q-Tip or adding to your favorite face mask mixture.

    7.  Raw honey face masks changed the game for my skin pampering routine.  Manuka honey is known to be the best choice for it’s potent antibacterial, anti-inflammatory compounds also containing antioxidant and humectant qualities.  In other words, honey masks help to aid in healing scars, breaking down the bacteria in pimples, retaining moisture in the skin and delaying the signs of aging.  Apply an even amount over your face with your fingers, gently massaging it into your skin and let sit for about 20 minutes before rinsing it off with lukewarm water.  Of course, Manuka honey is not the only kind you can use but be aware that as with most natural remedies, it’s crucial to buy organic, raw and unpasteurized.  *The heating (pasteurization) of these products kill the beneficial properties within.  For an added benefit, source local raw honey to help reduce allergies.

    8.  Replace your chemical-laden perfumes with all-natural scented oils such as rose, lavender, gardenia or jasmine.  Many boutiques can even customize a smell to your liking by combining a few of your favorites.  Be sure to opt for oils that are all natural with no artificial colors, scents or additives.  I find the best oils have no water or alcohol in them.  This makes for a higher quality product and will smell lovely much longer than your typical perfume.

  • How to Pair Summer Flats

    How to Pair Summer Flats

     “Shoes are just a pedestal.  What interests me is the power of the woman who wears them.”


    A good pair of flats can not only save you from achy feet but really make an outfit casual chic.  I love a cute pair of heels as much as the next girl but I have found that the right pair of flats can compliment your look by giving it a more relaxed yet sophisticated semblance.  Flats may not give you the same sexiness factor that heels do but there’s something to be said for a woman who can still exude the same kind of confidence in the way she carries herself.  So in some way, it’s kind of liberating.

    In big cities like Miami and Los Angeles, its not uncommon for women to wear heels everyday.  Some are even required to wear them to work but it seems brands have recognized the consumers desire for more versatile shoes.  More women are exploring footwear designs for everyday wear that offer a more modern and styled look.  Futhermore, our generation is significantly more aware of their overall health (Yes, they’re cute as hell but heels are not good for your feet, back or posture).  Perhaps you’ve discovered the beauty of flats long ago but I for one am finally appreciating all different varieties of flats other than just my combat boots and Uggs these days.

    Substituting flats for heels took some getting used to but I’m glad I’ve diversified my shoe collection for many reasons.  Flats are a favorite amongst many because they’re so low maintenance and easy to throw on but there are some guidelines to be aware of depending on the height of the shoe itself (ex: sandals, ankle booties, knee-high, etc.) and shape.  Once you have that figured out, you can concentrate on styling your outfit.

    DeziStyle

    For a casual chic daytime look, try pairing your flats with some distressed denim and fitted blouse or solid color tee.  I really like these Charles David slip on’s because the low cut elongates the leg and has a slimming effect.  This will also work well on heavier set women but beware if you already have long feet.  The space between the cuff of your pants and top of your shoe can exaggerate the length of your foot.

    DeziStyle

    Showing a little ankle is tasteful and sexy but be careful not to choose a pair of pants that have too wide of a leg or it will make your feet look oddly skinny.  For this reason, I love ankle skinny jeans.  And since bell bottoms are making a gradual comeback, might I recommend wearing them with some moccasins or thong sandals.

    DeziStyle

    If it’s too warm for pants, a skirt or pair of shorts could also work.  Long flowing skirts tend to look better with shoes that show a bit more toe so you’ll want to opt for a shorter skirt with closed toe flats.  Perhaps the exception for this would be a pair of low cut ankle booties…do they ever do any wrong?

    DeziStyle

    Pencil skirts and a loose top or blazer make a killer combination with flats for the work place or lunch with the girls.  On more casual days, a nice pair of sneakers can look quite nice with a pair of tailored pants.  Fortunately our weather in California can allow such an outfit, even in summer!

    DeziStyle

    Summer dresses just might have been invented for cute flats.  Free-flowing dresses with flats are a great match but remember, just like with the floor length skirts, open-toed shoes tend to pair better with longer cuts.

    DeziStyle

    Don’t be afraid to get wild with colors and cuts!  Sometimes just a simple pop of color on your shoes can really make a neutral outfit seem more fun and au courant, so get to shopping and tag your favorite looks with #DeziStyle on Instagram so I can see your creations!!

    DeziStyle

    Photography by Devin Anderson (My not so lil bro!)

    Blouse by F21 | Jeans by O2 Denim | Shoes by Charles David

  • Get Your Butt in Gear: 3 Exercises That Will Sculpt & Lift

    Get Your Butt in Gear: 3 Exercises That Will Sculpt & Lift

    Photography by Jennifer Biswas

    I long for the day when my workouts aren’t squeezed in between meetings and auditions.  Perhaps one day I’ll be one of those Bel-Air women who spend their afternoons in yoga pants, walking their dogs and gossiping with neighbors all day, but until then, my workouts need to be as efficient as possible.

    People tend to be surprised when I tell them that I rarely use weights in my fitness routine but, it’s a misconception to think you can’t tone your body without them.  On the contrary, the exercises I utilize to maintain core strength and define muscle are simple calisthenics that can be done almost anywhere.

    These three maneuvers are my favorite exercises to do whenever I have a spare 10-15 minutes to fit in some “gym time”.  Although it may seem like I’m only targeting the gluteus, you are in fact, toning arms and abs as well!  I’d like to think of them as ninja techniques because they are swift, effective and relatively painless.  Try this routine everyday for at least one week and tell me you don’t see and feel a difference in your body.  I bet you can’t!

    Exercise 1:  SQUATS!

    The dreaded squats!  Don’t worry, they’re not so bad if you break them up into sets.  Start by standing as tall as you can with your feet spread apart about shoulder-width.  Then lower your body as far as you can by bending your knees and pushing your hips back. Pause for a moment and then slowly push yourself back to the starting position.  If you are already physically active, try doing 4 sets of 25 throughout this routine.  If not, begin your first few days by starting with 2 sets of 25 and  incrementally adding more throughout the week.

    Exercise 2:  BACKWARDS LEG EXTENSION

    The name sounds more complicated than it is.  You can do this while on hands and knees for more stability, or try facing a chair, bend your body at the waist and place your hands flat down near the edge of the seat. Kick your left leg straight back, keeping your foot flexed so it forms a straight line with your torso.  Lower your leg back down and repeat.  Do an equal number of sets for each leg.  I would recommend you start with 25 each and gradually add more throughout the weeks ahead. Be sure you squeeze your glutes and leg muscles during the kicks and use slow, steady movements.  When your leg is as stretched back as possible, hold for a few extra seconds and really try to elongate your spine and leg as much as you can.  You should be able to feel your abs tightening.  

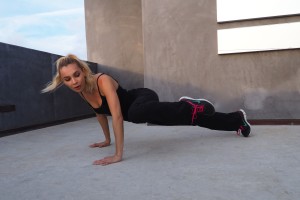
    Exercise 3:  KNEE TO ELBOW PLANKS

    Planking may not be the most exciting exercise but it is a great core strengthening workout.  You can try normal planking until you feel more comfortable to step it up to the next level of difficulty.  When you’re ready, start in a plank position and bring your right knee in towards your chest, keeping your other foot on the floor to balance. Bring your knee into your chest a total of 25 times and then alternate sides.  For advanced people, try doing a push up in between each rep.

    **These exercises should be practiced safely and with the correct techniques.  If you ever feel pain that does not feel like normal discomfort caused by exercising, stop immediately and make sure you are training accurately so you do not injure yourself.  Saftety first!

  • How to: Chic Braided Bun Updo

    How to: Chic Braided Bun Updo

    Photography by Jen Biswas

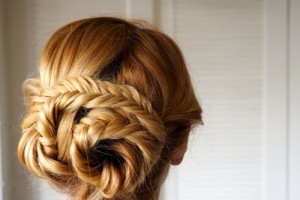
    Braids are one of the easiest ways to create a chic updo in just minutes.  A style such as this one may seem like something you could only achieve after a trip to the salon, but I teamed up with PuckerandPout.com to show you how to create this beautiful hair style for any occasion.  The great news is, perfection is not required for this look, sometimes the messier, the better.  Just follow these six simple steps and let the compliments roll in.

    Step 1:  Spray hair with dry shampoo and comb through evenly.  This will give hair more texture and make the braiding process easier.

    Step 2:  Separate hair into two sections with one side being a deeper part than the other.

    Step 3:  Grab the sections of the hair closest to the front of the hair and begin a fish braid. To do so, simply divide the hair into 2 equal sections. Begin the braid by gathering a small section of hair on the outer side of the parted side and join it directly across the part into the opposite portion or hair.  Fishtail each side and secure the ends with clear rubber bands.  

      Step 4:  Use your fingers to gently pull the braids apart just enough to make a loose braid.  This will give the updo a fuller appearance.

    Step 5:  Twist the first braid into a bun-like shape and secure it to your head with bobby pins.  Take the second braid and wrap around the first braid and secure with more bobby pins.  Be sure to hide the ends of the braids by tucking them in.  Feel free to use the comb’s pick to exaggerate the pulled braid look or leave it as is for a more uniform look.

    Step 6:  Mist hair with a light hair spray to keep it in place and voila!  You’ve created a masterpiece!

    Special thanks to Katie Maloney and Jen Biswas of PuckerandPout.com

  • The Beauty Guide to Staying Healthy & Hydrated During the Holiday Season

    The Beauty Guide to Staying Healthy & Hydrated During the Holiday Season

    Staying hydrated is crucial to your health, appearance and overall well being, so DeziStyle is here to help you target some key areas.  These products are personal favorites but feel free to take the concept and find a brand that suits your preferences.  I tend to opt for natural products as often as I can and there are a lot of great ones out there if you’re willing to do a little research.

    With proper hydration your skin will glow, your hair & nails will grow stronger, and you are less susceptible to disease and other ailments.  Every cell, tissue and organ in your body needs water to function properly so why not give it what it needs to preform at full steam.  Here are a few ways to feel revitalized and pamper yourself from the inside out.  Take note that some of these products are best used during drier months and may be switched out when the weather warms up and humidity levels rise again.


    1.  Keep your hair happy and healthy!

    The winter can be harsh on your hair, even in sunny California, so it’s important to take extra care during the cooler months when the weather is dry.  Brittle hair isn’t a good look on anyone so do yourself a favor and be sure to give your luscious locks a little more TLC this holiday season.  Moroccanoil Intense Hydrating Mask has traveled the world in my toiletries bag to give my hair some serious hydration when I’m on the go.  I love the smell and it makes my hair so smooth and silky, even after one treatment.

    Moroccanoil


    2.   Keep your kisser kissable!

    There’s nothing worse than ending up with dry, cracked lips under the mistletoe so why not put an end to painful dry lips with an inexpensive, mega-intense lip repair by Aquaphor.  It has vitamin C & E, shea butter and a soothing chamomile essence.  I use it in my routine every morning and before bed each night.

    Aquaphor

    3.  Supplement your daily intake

    We all indulge during the holidays, at least just a little.  Our sugar and alcohol levels are generally spiked as much as the holiday party’s punch bowl and sleep schedules are far from what they were just before months before.  We tend to deplete ourselves of  the proper nutrients in favor of flaky pies and  holiday themed cocktails but I always treat myself to a boost of nutrition every morning with a medley of vitamins including biotin (for hair & nails), vitamin E, vitamin C, vitamin D3, zinc, omega 3 fish oil, calcium, collagen, lecithin & B-complex.  They vary depending on symptoms or necessity but the aforementioned are my staples.  However, let’s say you’d prefer to take one, all encompassing vitamin instead.  MegaFood is a terrific brand that is certified farm fresh and vegan, amongst it’s many accolades.  They offer a women’s multi-vitamin that can be taken even on an empty stomach.  Perfect for combating those caffein filled mornings that I know we are all guilty of.

    MegaFoodMegaFood


    4.  Keep your cuticles hydrated

    Keep your mani fresh and revitalize your cuticles with Julep Essential Cuticle Oil.  This travel sized roll-on oil contains 7 essential oils for strengthening nails and cuticles and smells therapeutic.  *Pro tip: Use a small amount of the oil to tame fly aways

    Julep-Essential-Cuticle-Oil


    5.  Don’t forget to moisturize

    I truly am obsessed with this Intensive Care lotion by Eucerin.  It’s the bomb.com and I tell no lies.  Just think of the difference it would make on his hands too.   😉

    Eucerin


    6.   Seal your locks

    My hair dresser started using this on my hair years ago and I never looked back.  I use this at home, at the salon, and on my travels.  Literally wherever my hair goes, so does Paul Mitchell’s Super Skinny Serum. 

    Paul Mitchell

    7.  Plump up your face 

    Moisturizing your skin fills in lines and reduces the appearance of imperfections.  By applying a quality moisturizer each day, your skin will radiate health, youth, and be less prone to acne.  I’ve been using this one for years now.  In fact, I own quite the arsenal of Raya products because they are made with excellent ingredients and work very well.  I use this Vitamin B cream during the winter and switch to the Vitaplex-C revitalizing cream to replenish vitamins C, A, D, and B as well as help combat UV radiation.  It’s non-greasy but deeply soothing to the skin and made of key natural ingredients.  Check out their whole line of products at Raya.com

    Raya8.  Teatox: Delicious & Nutritious!

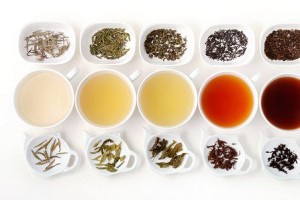
    I have yet to meet a tea I do not like and luckily my tenacious addiction is a healthy one.  I choose my tea based on time of day, flavor and medicinal benefits.  I strongly urge you to research your top health concerns (ex: weight loss, immunity, digestion, cramps, energy) and pick a tea recommended to aid in each scenario.  Drinking tea throughout the day keeps you hydrated but it’s hard to take with you when you’re busy.  My most used item I own could quite possibly be my sealable Thermus brand tumbler.  It keeps the liquid inside either cold or hot for up to 8 hours.  (Why not add this item to your XMAS list!  Any avid coffee or tea drinker would definitely appreciate one of these).

    Java-Tea-loose-leaf

    9.  Make ’em hard

    My sexual innuendos may be weak but my nails won’t be!  OPI Nail Envy is going to cost you a little more than your average polish but you can count on having strong, lustrous nails with the use of this strengthening formula.

    OPI-Original-Nail-Envy

    10.  Feelin’ Fresh 

    Use an all natural toner like this floral rose water by Fresh.  It’s 100% pure rose water and helps to sooth & tone your face.  This concoction gets extra points for being sulfate free with no synthetic dyes or fragrances.  A nice, refreshing mist or two is all you need after cleansing the skin.

    Rosewater


  • DIY: Distressed Denim Jeans for Beginners

    DIY: Distressed Denim Jeans for Beginners

    What you’ll need:

    A pair of jeans

    A pen

    Coarse sandpaper

    Scissors

    An insertable sturdy surface (mini cutting board)

    A little elbow grease & patience!

    Distressed Denim DIYStep One:  Find an old pair of jeans to practice on if you’ve never tried distressing your own jeans before.  Unfortunately I learned that the hard way.  If you don’t have a pair you’re willing to test your skills on, head to a local thrift store and pick up a pair for a couple bucks.  You’ll be glad you did should your sanding not go as planned.  Typically the lighter the shade, the better it seems to look, so opt for lighter denim when picking your pair.

    Distressed Denim DIYStep Two:  Put your jeans on and use a pen to mark a rough outline of where you want to place your distress marks.  It’s important to make the marks while wearing them to avoid awkward placement.

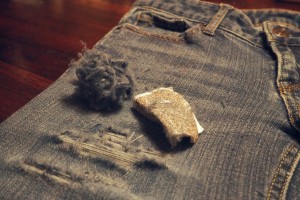
    Distressed Denim DIYStep Three:  Insert a sturdy surface into the pant leg just under the area you wish to distress.  I have used items like mini cutting boards or even a magazine.  Next, use a decent sized strip of coarse sandpaper to rub the denim in a vertical, methodical motion.  This is where patience and persistence comes into play.  It’s tedious work but once you start wearing down the area it becomes a little easier.  You may also use a pair of scissors but don’t overdo it.  Cutting with scissors won’t give you the frayed look we’re going for but it will help with small cuts and tears.

    Distressed Denim DIYFeel free to (for lack of a better word) go H.A.M. and distress the hell out of them.  If you’re arm gets tired, try using different tools.  I once used a cheese grating stick to break the fibers apart so there’s no limit on the instruments you can utilize.

    Distressed Denim DIY

    You can reinforce your marks by stitching around it but I prefer to let mine progressively change over time with natural wear and tear.  Think of this process as a head start.  Once you’re satisfied with the amount of distress, you’re done!  Shake the loose sandpaper and threads off and enjoy!

    Distressed Denim DIY

  • 6 Reasons to Love Lemons + DIY Scrub

    6 Reasons to Love Lemons + DIY Scrub

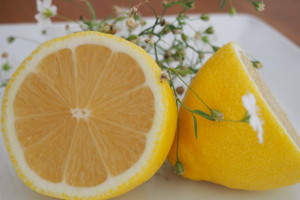
    When it comes to fruit, lemons seem to get a bad rap.  Although they may not be a favorite for fruit salads or candy flavors, lemons are a staple on my weekly shopping list for a very good reason.  Once I discovered just how many health and household benefits it provides, they quickly became a prized item for me.  There are several good uses for lemon but these six are my most frequently utilized ones.

    1. Lemon juice is a natural beauty enhancer.  Spot treating acne with some lemon on a Q-Tip is a widely known trick for combating zits by helping it to kill bacteria and dry up the oils causing the breakout.  And, just as good as it is to use topically, its extremely healthy to incorporate it into your diet to help combat weight gain, control high blood pressure, give hair and skin a vibrant glow and can fade scars or dark spots.  You can also use lemon to alleviate the effects of sunburn. Since I incorporated lemon juice into my diet each day, I’ve seen a dramatic difference in my skin.  I don’t break out as much and there is a noticeable glow.  Try replacing your morning coffee with a cup of hot water, fresh lemon and honey.  Not only will you get a kick of vitamin-C, but it tastes great and will hydrate your skin.

    2. The 60 second tooth whitener.  Lemon is a powerful cleanser and with just a smidge of baking soda and a squirt of lemon juice, you’ve got your own homemade remedy for coffee stained teeth.  Alternatively, you can squeeze a drop of lemon onto your toothpaste before you brush.  As a side note, lemon juice is extremely acidic so be aware of any burning or sensitivity and be sure not to brush for more than a minute or so!  Lemon also stops gum bleeding & fights halitosis –AKA stinky breath.  Here’s a tip: when on a date, always order a slice of lemon in your water and when the meal is over, take a healthy little suckle on it.  It will work better and quicker to clean and deodorize your breath than any stick of gum would!

    3. Nutritious & delicious!  There are a ton of health benefits to drinking lemon but the most important ones to me are the incredible source of nutritious components inside (vitamin C, vitamin B, proteins and carbohydrates), it’s powerful flu fighting properties, it’s ability to flush toxins from the body, prevent diabetes and aid in digestion.  As mentioned, I love juicing a fresh lemon in the morning and adding it to fresh brewed tea with local honey, which happens to also be good for allergies or sore throats.  Or, try adding lemons and fresh mint to a jug of cool water for a revitalizing, healthy beverage – *vodka optional.

    4. All natural hair-apy.  For those that suffer from dry scalp and dandruff, lemon oil has been shown to reduce or eliminate the symptoms associated with this frustrating issue.  You can try making your own concoction using a bit of coconut oil, lemon juice, and honey.  Subsequently, when I was a kid there was a product called Sun In, anyone remember it?  Well, you can basically garner the same effects of natural highlights by streaking lemon juice in your hair and laying out in the sun for some time.  It was a weekend ritual for us girls, especially during the summer months, so I can vouch for it’s golden aftermath.

    5. Safe & non-toxic cleanser.  Not only is lemon juice great for cleaning out toxins and bacteria in your body, but it’s a powerful substitute for all those chemical-filled household products.  Use lemon juice to clean grout, stains, rust, or those grimy cutting boards.  I always toss my used lemon peels in the garbage disposal to help keep it clean and make the kitchen smell extra fresh!

    6. Make a sugar scrub!

    6 Reasons to Love LemonsThis is probably the most fun use of lemon. Make a scrub that you can use all over your body and face!  You’d pay a pretty penny to have an all organic scrub like this at any spa, so why not pamper yourself a little.  You can use the same scrub to remove callouses, moisturize skin, cleanse your face, use as a lip scrub or even slather it on some sliced apples for dessert because, it’s all natural!  All you need is four simple ingredients to complete your sugar scrub recipe: lemon, brown sugar, coconut oil and honey.  Of course there are a ton of other recipes you can try (and I recommend you do), but these four are the most important when making a proper scrub for all-over body use.

    As I mentioned earlier, lemon cleanses, lightens scars or sun spots, brightens complexion and tightens pores.  The brown sugar acts as a gentle scrub to help slough off dead skin and contains a natural source of glycolic acid, helping to rid your skin of bacteria all while costing much less than your local microdermabrasion clinic.  Please note that although any sugar can work for this recipe, I chose brown sugar because the crystals tend to be much smaller and more gentle on your skin, especially the face.  If you haven’t tried coconut oil in a scrub yet, here’s a couple reasons why you should.  Coconut oil contains vitamin E, leaving skin moisturized and protected.  It is also rich in useful proteins which helps the skin to repair and heal, as well as act as an anti-aging formula.  One last merit for coconut oil is that it doesn’t go rancid for a very long time so it should preserve your yummy concoctions until you’ve finished using them. (Tip: Look for organic cold pressed, unrefined, chemical free coconut oil.  This is the healthiest.)  Last but certainly not least is the honey. Honey is not only a delicious distraction while making your scrub but it has been widely known to be an anti-fungal, specifically to acne-prone skin.  This nectar of the gods is also a natural humectant, keeping moisture locked into the skin and giving you a glowing, hydrated complexion.

    Now that you have the ingredients, let’s talk about preparing it!  You may very well use your own discretion to eyeball out the amount you’d prefer to make a scrub suited to your preference but here’s a guideline for your convenience.  Mix these all together very well until you get the consistency you’re looking for and voila!  It takes no time and you’ve got yourself a top notch skin care product.  This recipe is just right for me but feel free to go heavier or lighter on each ingredient if you wish for a silkier or more abrasive scrub.  Enjoy!

    • 1/2 Fresh squeezed lemon juice
    • 1/2 cup brown sugar
    • 1 tbsp melted coconut oil
    • 1 tbsp organic local honey

    6 Reasons to Love Lemons6 Reasons to Love Lemons6 Reasons to Love Lemons6 Reasons to Love Lemons6 Reasons to Love Lemons

    Photography by Desirée Anderson

  • Travel Tips: 9 Ways to Make Life Easier

    Travel Tips: 9 Ways to Make Life Easier

    In honor of my upcoming trip to Europe on Tuesday, I wanted to share some of my top travel tips for preparing and packing.  Over the years I’ve learned to whittle it down into something easy and manageable to handle when the daunting task comes up.  Everything about travel is exciting but I’d say packing for a trip is just a notch above the unpacking part.  So, I’ve devised a plan for your convenience (and mine) to help alleviate some of that pressure.  And please, feel free to comment below with some of your travel tips, tricks, life hacks or suggestions below.  I’m always happy to add another skill set to my repertoire.

    1)  Pick luggage that doesn’t complicate your life.

    So, the first thing to consider when traveling abroad is what you’re going to be carrying everything in.  Depending on what kind of trip you’re doing you might only be taking a backpack along, which I’ve done on multiple occasions, but in this case, let’s assume you are planning on taking a suitcase.  Ever since some genius finally decided to put 4 wheels instead of 2 on suitcases it’s made traveling SO much easier.  I definitely recommend buying one with four 360 degree wheels, dubbed ‘spinners’, if you are in the market for new travel ware.  They’re becoming standard in all the newer suitcases being made these days.  I know there are designer suitcases out there, and some of them are gorgeous, but for this trip I just wanted something I could lug along and not worry about scuffing up when bouncing around from city to city catching planes, trains and automobiles.  And would you believe it, Costco had just what I was looking for.  Lightweight, durable polycarbonate suitcases that come with a smaller matching jr. suitcase for only $130.  Also, they are cat approved- just ask my two fur babies.

    2)  Strategically pack your carry-on

    Packing your carry-on can be just as important, if not more important, than packing your main suitcase.  I think of my carry-on as my survival bag.  When you’ve been stuck for days in a foreign country with nothing but the clothes on your back and the random array of personal items stashed away in your purse, you learn very quickly how necessary it is to pack key essentials in your carry-on.  Generally if the airline loses your bag, the daily allowance they reimburse you still does not cover the bare minimum you’d require to replace the missing articles needed, so it’s better to be prepared.  Just keep in mind that some airlines have more strict rules than others about the size of your carry-on so always check ahead of time and remember not to fill it up too much in case your suitcase is overweight and you need to stuff some things in it.  Overage fees are no joke and can be easily avoided by being vigilant.  With that being said, here is a list of things I always take on board with me:

    – At least one utility travel converter. I prefer ones that also have a USB plug-in.

    – All chargers for phone, camera, travel speaker, etc.  These can be expensive to replace, if at all.

    – All my vitamins (pre-organized into daily packets) and medications, if necessary.  I also like to stick some cough drops, gum, advil and a couple of my favorite tea packets in there too.

    – A sweater & an extra pair of underwear (trust me, you’ll be thankful if your suitcase ever gets lost after a long international flight).

    – A compact tote in the chance that you need an emergency bag for those spontaneous shopping sprees at the airport souvenir shops or if you feel like putting a few select items in it to have under the seat in front of you for easier access.  I have a little drawstring pouch that’s smaller than the size of a donut when its folded up so it hardly uses any space at all.

    – Travel sized toiletries: deodorant, anti-bacterial gel, moist face wipes, chapstick, lotion, toothbrush/toothpaste, eye drops, nail file and comb.

    – My iPad, a good book and my ear buds

    – Healthy snacks

    – A pair of sunglasses/reading glasses and my eye mask.

    – An external battery- because there’s nothing worse than dying electronics when you’re stuck on a plane.

    3)  Invest in a travel steamer

    You’ve probably already heard that rolling your clothing helps to prevent wrinkles.  And it does.  Significantly.  But, anyone who’s done it knows that some wrinkles are just kind of inevitable.  Now before you freak out about taking a steamer along in your luggage, let me assure you that it’s been one of those items that I’m always so relieved to have brought.  The travel sized one I purchased from Target for $30 has already flown around the world with me and will embark on this next journey without question.  With this baby, I could literally fold my clothes into airplanes and it wouldn’t make one bit of a difference once I use my handy-dandy steamer.  I actually use this when I’m at home instead of my bigger one since assembling and disassembling it is more time consuming.

    4)  Pack dual use items

    It can be tricky but, I try my best to consolidate my clothing and pack articles that can be used for more than one thing.  A great item that can be utilized in hot or cold weather is a light scarf.  It can be worn as the obvious but also as a shawl, sarong, head wrap, impromptu belt or sometimes I use it on the plane in place of my eyemask.  Other items might include leggings that can be dressed up at night or worn for exercising and exploring during the day.  Finding things like these will cut down your packing list and give you more options when you don’t have the accessibility you have at home.

    5)  Don’t forget the little things that make your down time better

    When the day is done and you finally make it back to your hotel room, there’s a couple small things that will make life a little more enjoyable and give you a touch of home.  I always pack a portable speaker, a couple tealight candles, my robe and a wine opener.  There’s nothing worse than getting back to your room to unwind with a nice bottle of wine only to discover there’s no way to pop the cork!

    6)  Bring carabiners!

    This one may have caught you by surprise but I have found so many different uses for them throughout my travels.  I’ve used carabiners to secure my sneakers to the outside of my backpack after trekking through mud, keeping keys or my camera attached to me/my bag, hanging grocery or shopping bags, attaching tarps, clipping zippers together to deter theft, keeping hair ties or jewelry together, or even tightening your pants (true story).  I usually have a variety of sizes and randomly clip them to my luggage and bags.

    7) Bring a drawstring laundry bag

    Hopefully you get a chance to hit a laundromat while you’re on the road but in the meantime, all that dirty laundry has to go somewhere.  I can’t stand the thought of it laying against my clean clothes so I bring a separate bag to house it all.  Large Ziplocks can work as disposable ones or Target carries laundry bags for as little as $1.99 .  Throw some dryer pads in there to mask any odors or just keep your suitcase smelling fresh.

    8)  Cover your shoes

    If you think about where the bottom of your shoes have been you probably wouldn’t want them rubbing up against everything in your suitcase.  For this reason, I put each pair of shoes into their own dust bags.  As an alternative, you can buy shower caps from the Dollar Store or even use plastic grocery bags.

    9) Take pictures of the belongings you’re bringing

    Now I know this may sound completely paranoid and before my bag was stolen, I would’ve agreed.  But, a lesson was learned and now I feel compelled to share it.  If the unfortunate case should ever arise that your suitcase goes missing, the first thing baggage claim will want is an exact description of your bag.  Sounds easy but try describing your suitcase out loud right now.   Do you even know the brand name of your suitcase or it’s dimensions?  You’d be surprised by how many people don’t have a clue.  They’ll also want to know the contents in it.  Again, it sounds easy but once you’re actually required to itemize each individual article to feign a chance at reimbursement it becomes quite a mission.  Not only does it make your life easier but you also have picture evidence.

    So there you have it, my top 9 tips for packing.  More travel posts to come so be sure to subscribe.  Now it’s time for me to pack my things and jet!  First stop: Copenhagen!